Pixhawk / Pixracer firmware flashing
Pixhawk, Pixracer or COEX Pix firmware may be flashed using QGroundControl or command line utilities.
Modified firmware for Clover
It is advisable to use a specialized build of PX4 with the necessary fixes and better defaults for the Clover drone. Use the latest stable release in our GitHub repository with the word clover, for example, v1.8.2-clover.5.
QGroundControl
Open the Firmware section in QGroundControl. Then, connect your flight controller via USB.
Choose PX4 Flight Stack. If you wish to install the official firmware (with EKF2 for Pixhawk), choose "Standard version". In order to flash custom firmware, choose "Custom firmware file..." and click OK.
WARNING
Do not unplug your flight controller from USB during flashing!
Firmware variants
The name of the firmware file contains information about the target flight controller and build variant. For example:
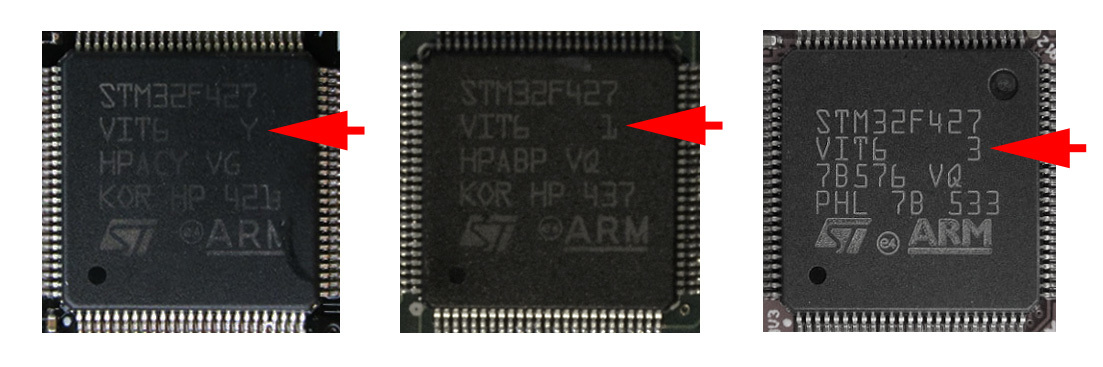
px4fmu-v4_default.px4— firmware for COEX Pix and Pixracer with EKF2 and LPE (Clover 3 / Clover 4).px4fmu-v2_lpe.px4— firmware for Pixhawk with LPE (Clover 2).px4fmu-v2_default.px4— firmware for Pixhawk with EKF2.px4fmu-v3_default.px4— firmware for newer Pixhawk versions (rev. 3 chip, see Fig. + Bootloader v5) with EKF2 and LPE.
TIP
In order to flash the px4fmu-v3_default.px4 file, you may need to use the force_upload command in the command prompt.
Command prompt
PX4 may be compiled from the source and automatically flashed to the flight controller from the command prompt.
To do this, clone the PX4 repository:
git clone https://github.com/PX4/PX4-Autopilot.git
Select the appropriate version (tag) using git checkout. Then compile and upload the firmware:
make px4_fmu-v4_default upload
Where px4_fmu-v4_default is the required firmware variant.
In order to upload the v3 firmware to Pixhawk, you may need to use the force_upload option:
make px4_fmu-v3_default force-upload