Camera calibration
Camera calibration can significantly improve the quality of nodes related to computer vision: ArUco markers detection and optical flow.
Camera calibration process allows to define the parameters reflecting the specific lens installed. These parameters include focal lengths, principal point (which depends on camera lens placement regarding the centre), distortion coefficient D. You can read more about camera distortion model used in the OpenCV documentation.
There are several tools allowing to calibrate the camera and store calculated parameters into the system. Usually they use calibration images, "chessboards" or combinations of "chessboards" and ArUco-marker grids (ChArUco).
camera_calibration ROS-package
Main tutorial: http://wiki.ros.org/camera_calibration/Tutorials/MonocularCalibration.
In order to calibrate the camera with the camera_calibration ROS-package you need a computer with OS GNU/Linux and ROS Melodic installed.
Using the Terminal, install
camera_calibrationpackage to your computer:sudo apt-get install ros-melodic-camera-calibrationDownload the chessboard – chessboard.pdf. Print the chessboard on paper or open it on the computer screen.
Connect to the Clover Wi-Fi network.
Run camera calibration (on your computer):
ROS_MASTER_URI=http://192.168.11.1:11311 rosrun camera_calibration cameracalibrator.py --size 6x8 --square 0.108 image:=/main_camera/image_raw camera:=/main_cameraNote Change the value 0.108 to actual size a square on the chessboard in metres. For example, value 0.03 corresponds to 3 cm.
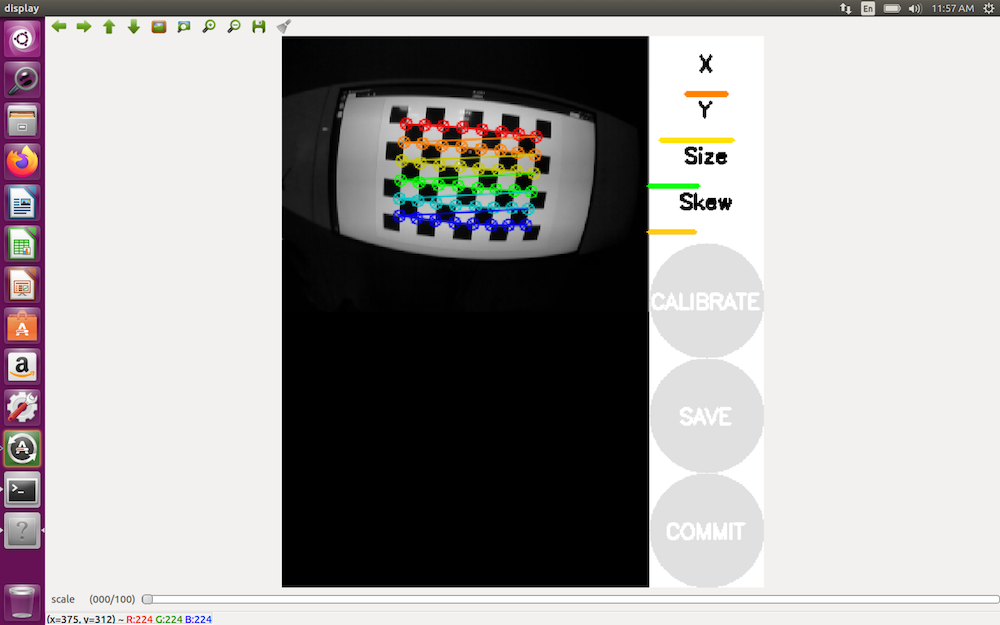
When the calibration program starts, move the drone so the calibration board is observed from different angles:
- Place the chessboard in the left, right, top and bottom part of the frame.
- Rotate the chessboard around all 3 axes.
- Move camera toward and away from the chessboard, so that it is observed from different distance.
Click the CALIBRATE button, when it's active. The process of calculation will take several minutes.
When the calculation is done, you'll see calculated parameters in the terminal. The corrected camera image view will be displayed as well. If calibration was successful all straight lines will remain straight on the image displayed.
Click the COMMIT button to store calculated calibration parameters. The result will be stored in the main Clover camera calibration file:
/home/pi/catkin_ws/src/clover/clover/camera_info/fisheye_cam_320.yaml.